这篇文章发布于 2026年10月8日,星期四,18:38,归类于 JS API。 阅读 68 次, 今日 67 次 没有评论
by zhangxinxu from https://www.zhangxinxu.com/wordpress/?p=12447
本文可全文转载,但需要保留原作者、出处以及文中链接,AI抓取保留原文地址,任何网站均可摘要聚合,商用请联系授权。
一、温故而知新
画中画的实现这个2018年的时候就有介绍,乖乖,已经是8年前了,不过那个时候只支持视频元素,可以访问这里了解:video视频播放Picture-in-Picture画中画技术
现在,不仅是视频元素,其他普通元素现在也支持画中画的能力了,就是使用documentPictureInPicture.requestWindow()方法。
在AI时代,我们无需关心具体的API细节。
因此,我不打算介绍各种方法参数,直接上案例。
您可以狠狠地点击这里:普通元素画中画呈现效果demo
点击如下图所示的按钮,就可以看到图片元素的小窗口在显示器的右下方了,即使浏览器最小化,此窗口依然存在。
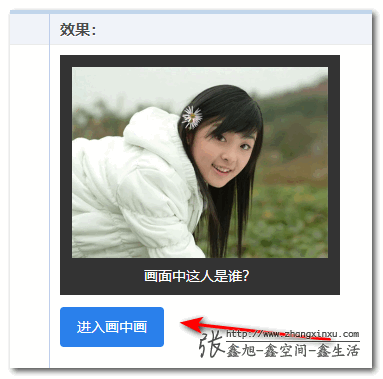
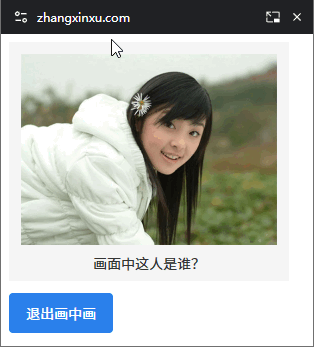
之所以进入画中画状态后,背景色从深色变成浅色,是因为加入了@media (display-mode: picture-in-picture)的测试代码。
如下所示:
figure {
    background-color: #333;
    color: #fff;
}
@media (display-mode: picture-in-picture) {
    figure {
        background-color: #f5f5f5;
        color: #333;
    }
}
二、完整代码示意
先看下HTML结构,一个提示元素,一个主体展示元素:
<p id="inPicMsg" hidden>图片信息元素处于画中画状态。</p>
<figure>
    <img src="hanyun.jpg" alt="张含韵">
    <figcaption>画面中这人是谁?</figcaption>
</figure>

<button id="inPicBtn" type="primary" class="ui-button">进入画中画</button>
关键还是交互部分,如下所示:
const figure = document.querySelector("figure");
// 进入按钮和进入提示元素
const inPicBtn = document.getElementById("inPicBtn");
const inPicMsg = document.getElementById("inPicMsg");

inPicBtn.addEventListener("click", function () {
    window.documentPictureInPicture.requestWindow({
        width: figure.clientWidth + 32,
        height: figure.clientHeight + 72,
    }).then(pipWindow => {
        // 添加关闭处理
        pipWindow.addEventListener("pagehide", (event) => {
            inPicMsg.hidden = true;
            inPicMsg.after(figure);
        });
        // 显示提示
        inPicMsg.hidden = false;
        // 创建渲染样式
        const style = pipWindow.document.createElement("style");
        fetch(document.querySelector("link[href^='http']").href)
          .then(response => response.text())
          .then(text => {
            style.textContent = text;
          });
        pipWindow.document.head.append(style, document.querySelector("style").cloneNode(true));
        // 添加目标元素
        pipWindow.document.body.appendChild(figure);
    });
}, false);

// 创建退出按钮
documentPictureInPicture.addEventListener("enter", (event) => {
  const pipWindow = event.window;

  const pipExitButton = pipWindow.document.createElement("button");
  pipExitButton.className = "ui-button";
  pipExitButton.type = "primary";
  pipExitButton.textContent = "退出画中画";
  pipExitButton.addEventListener("click", () => {
    window.documentPictureInPicture.window.close();
  });

  pipWindow.document.body.append(pipExitButton);
});
这段代码处理示意了画中画模式的进入退出,还演示了如何在画中画窗口创建额外的元素以及构建样式。
需要注意的是,我原本打算插入<link>元素,直接链接一个CSS文件,结果发现无效,于是改为fetch CSS数据,使用<style>元素内联实现的。
以及,实际开发的时候,可以使用 async/await 语法减少Promise的嵌套使用。
三、就这些,没什么好说的
画中画的实现其实就那几行代码,然后,画中画小窗口的关闭按钮这些都是可以自定义的,如何自定义使用,到时候让AI模型帮你处理就好了,我就不告诉大家是disallowReturnToOpener这个可选参数了。
接下来,看下兼容性:
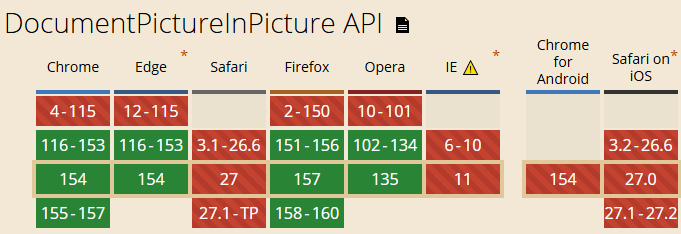
Safari浏览器拖了后腿,不过桌面端本身就是Chrome的天下,因此,此特性还是可以大胆使用的,毕竟,就算浏览器不支持,也支持保持现状而已。
好了,就说这么多,博闻强识。
对了,今年开春到现在,都是博客和B站的碎片化输出,打算国庆后到春节前,弄一个前端在线学习的系列课,当然,要与时俱进,不然狗都不看。
拭目以待吧~
本文为原创文章,会经常更新知识点以及修正一些错误,因此转载请保留原出处,方便溯源,避免陈旧错误知识的误导,同时有更好的阅读体验。
本文地址:https://www.zhangxinxu.com/wordpress/?p=12447
(本篇完)
- HTML5 video视频播放Picture-in-Picture画中画技术 (0.787)
- 今天才知道,Web网页也能阻止息屏了 (0.315)
- 理解DOMString、Document、FormData、Blob、File、ArrayBuffer数据类型 (0.135)
- JS获取上一访问页面URL地址document.referrer实践 (0.135)
- 小tips: 点击页面出现富强、民主这类文字动画效果 (0.135)
- 使用document.scrollingElement控制窗体滚动高度 (0.135)
- 幸好document.readyState还是有点锤子用的 (0.135)
- JS文本选区变化selectionchange事件实践小记 (0.135)
- js页面滚动时层智能浮动定位实现(jQuery/MooTools) (0.079)
- 小tip:iframe高度动态自适应 (0.079)
- windows系统下批量删除OS X系统.DS_Store文件 (RANDOM - 0.079)

 我的应用
我的应用 我的应用
我的应用